Thursday, December 22, 2011

Snowman Biscuits... and Merry Christmas!!

This year passed in a blink!... and it seems to me that each year is passing even faster than the previous one...isn't that crazy?. In the last days I have said to myself: "I'm not going to do anything today, I'll just relax" but it doesn't really work!, there's always something and there I am again, jumping here and there...
We moved to a beautiful town last December. It was the sort of change I was really looking forward to. Miraculously we sold our previous house in 4 weeks and in the meantime we found the perfect one for us, well located, already empty, in great condition and next to our son's school. It was all meant to be!. I feel so happy here!.
Change didn't stop there, I began to study clinical hypnosis in September and I LOVE IT!. A great new window has been opened for me and I feel very grateful for that.

But let's go to the biscuits now...

I wasn't sure if I would have the time to do Christmas biscuits this year, too much going on! But I managed to find a bit of time and here they are!.

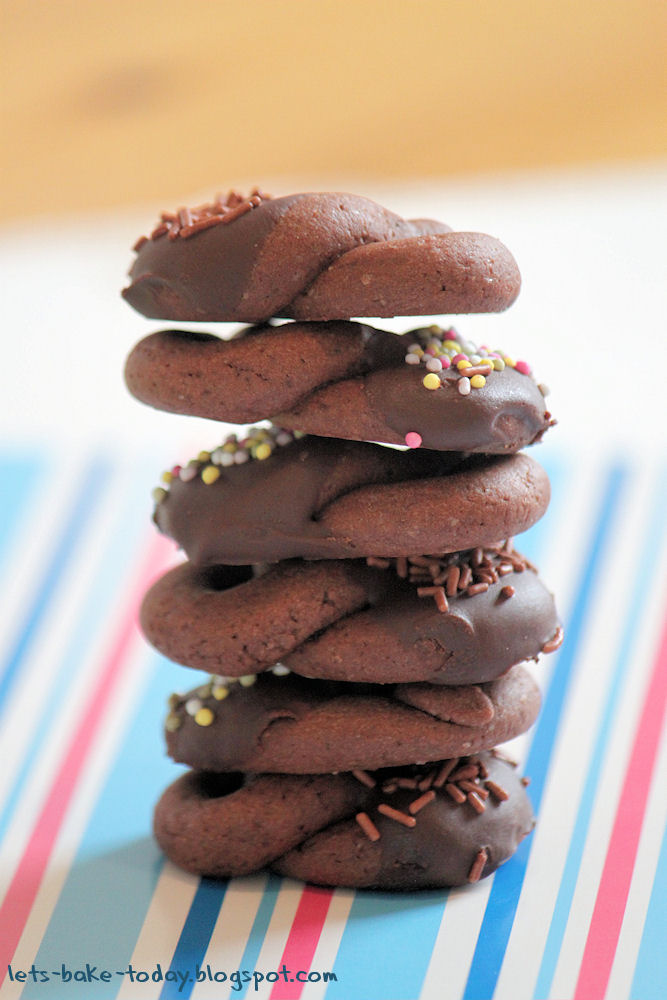
I had very little time to decorate them, but lots of fun!.
The recipe as follows:

For the biscuits:

Ingredients:
-5 cups all-purpose flour
-2 teaspoons ground ginger
-1 teaspoon ground cinnamon
-1 teaspoon ground cloves
-1/2 teaspoon baking soda
-1/2 teaspoon salt
-zest of one orange (optional)
-1 cup (250gr) unsalted butter, softened
-1 cup sugar
-1 large egg
-1 cup molasses (chancaca in Chile)

Method:
1. Whisk together the flour, ginger, cinnamon, cloves, baking soda, salt, and orange zest (if you're using it) in a medium bowl.

2. Cream together the butter and sugar with your mixer until light and fluffy. Add the egg and molasses and mix until well blended.

3. With the mixer on low, gradually add the flour mixture to the butter mixture until the two are thoroughly blended.

4. Turn dough onto a work surface and divide into three equal portions. Form each one into a rough disk. Now you're ready to roll, chill, and cut out cookie shapes.

5. Preheat the oven to 350°F (175°C)

6. After you've rolled and cut the dough and the cookies are on parchment-lined cookie sheets , bake them on the middle rack of your oven for 12-16 minutes or until the cookies start to turn a deeper brown around the edges.

7. Cool the cookies completely before decorating.

*This recipe was taken from the book "Cookie Craft"*

I'm very sorry to say I don't have a tutorial for the decoration!!! I promise to give you one the next time.

Wishing you all a very
MERRY CHRISTMAS!!
Let's count our blessings and be thankful for all of them.

"Deep at the center of my being there is an infinite well of gratitude. I now allow this gratitude to fill my heart, my body, my mind, my consciousness, my very being. This gratitude radiates out from me in all directions, touching everything in my world, and returns to me as more to be grateful for. The more gratitude I feel, the more I am aware that the supply is endless."
(Louise L. Hay)

Friday, November 4, 2011

Raw chocolate treats! - Superfood


Have you ever heard the term 'Raw Chocolate' before? you're maybe more familiar with the word 'Cacao'.

David Wolfe
, in his excellent book 'Superfoods' puts Cacao (raw chocolate) in second place in the list of the top 10 superfoods. But please don't think that with this he means the chocolate bar you get from the shops....no no no....this actually refers to the main and most important of its ingredients: CACAO.

"All chocolate is made from cacao beans (Also known as cocoa beans). Cacao is chocolate. All the antioxidant value, mineral benefits, neurotransmitter rejuvenating properties, and overall health-giving qualities of chocolate are found in original cacao. Chocolate consists of just one ingredient - no sugar, no dairy, no chemicals required - that one ingredient is cacao."

And because I love chocolate, as much as you do out there, I became very interested in this particular part of the book.

Amazing to read that Cacao is the best natural source of the following nutrients:
-Antioxidants
-Magnesium
-Iron
-Chromium
-Manganese
-Zinc
-Copper
-Vitamin C
-Omega-6 Fatty Acids
-Phenylethylamine (PEA)
-Anandamide
-Tryptophan
-Serotonin
-Fiber
-Methylxanthines: Caffeine and Theobromine
No wonder why is also called -since the 18th century- "the food of the gods"!.

I was very surprised (and happy!) when Indigo Herbs (where I bought the Lucuma powder) contacted me to offer to send me a "Raw chocolate kit" to give it a try, experiment and then let them know what I thought about it. It took me a second to say DEAL!. This happened immediately after I read David Wolfe's book....isn't that the sweetest coincidence?.

A few days later I received this in the post:

Without even opening the packet, I could smell the chocolate....ooooh my!, the contents?:

Raw Agave Nectar, Raw Cocoa Butter, Raw Cacao Powder, Vanilla and a leaflet with the instructions.
Because it was the very first time I had in my hands the wonderful opportunity to make my very own chocolate, instead of using all the ingredients at once (this wonderful kit contains enough to prepare 750gr!), I decided to use 100gr to begin with.

I honestly felt like Willy Wonka!.

Temperature is really important....and as Michael, from Indigo Herbs, told me, you don't really need a fancy thermometer (although, if you have it, great!), simply put some water in a pan and as soon as it reaches the boiling point, remove it from the heat. Wait 5 minutes, use a heat proof bowl and place it over the water. Put the Cacao butter in the bowl (make sure no water comes in) and wait until in melts completely.

Once you see that the butter has completely melted, add the vanilla. Mix it well with the butter.
After that, add the cacao powder, one spoonful, stir gently and blend well, then another one until you've added all the cocoa powder you want to use.


Once the cocoa powder has blended completely with the butter and vanilla (pic above), add the raw agave nectar whilst still stirring gently.

Then stir and stir until you get a nice creamy consistency, like the picture bellow. Then with a spoon fill your chocolate moulds, you can also use ice cube trays (the silicon ones) or little petite four cases.

Because I knew the raw chocolate is bitter than the one you usually get in the shops, I added a little ball of marzipan to go inside my treats... (I love marzipan).

After that, put the tray in the freezer until they set and are firm enough to pop them out and enjoy them!.

I have to say....the flavour is intense and sensational... you feel 'chocolate satisfied' quicker than with the commercial type of chocolate. Knowing you're getting the very best of the cacao beans, all the goodness that ancient civilizations also enjoyed in many ways, makes you feel even better.

My 3 year old tried one of these treats and was soon asking me for more!!!....brilliant!!.

I still have more raw ingredients to give it another go so keep an eye on my blog.
My suggestion? definitely give yourself the pleasure of making your own, proper chocolate... your life won't be the same!


If you want to get a 'Raw Chocolate Kit' for yourself or as a present for someone else, go to Indigo Herbs of Glastonbury online. Excellent service and quality.

Thursday, September 29, 2011

Lúcuma pretzels....delicious!!


I recently bought powder lúcuma as its one of the 2 fruits I really miss from Chile (the other one is Chirimoya). I was very excited to try it in a recipe and here I am!. After making the successful chocolate pretzels from a previous post, I decided to do my very own variation with lúcuma....and let me tell you something, I like this one even better than the chocolate one!!...too good to be true? give it a go!:

Ingredients:
-100g or a generous 1/3 cup of unsalted butter.
-100g or 7 tbsp caster (superfine) sugar.
-1 egg
-200g of plain (all-purpose) flour.
-50g of lúcuma powder.

To decorate:
-Icing sugar

1. Lightly grease a baking tray or line with baking paper.
Beat together the butter and sugar in a mixing bowl until light and fluffy. Beat in the egg.

2. Sift together the flour and Lucuma powder and gradually beat in to form a soft dough.
Use your fingers to incorporate the last of the flour and bring the dough together. Make a ball, wrap with cling film and put in the fridge for 15 minutes.


3. Break pieces from the dough and roll into thin sausage shapes about 10cm/4 inches long and 6mm thick. Twist into pretzel shapes by making a circle, then twist the ends through each other to form a letter "B".

4. Place on the prepared baking tray, slightly spaced apart to allow for spreading during cooking.


5. Bake in a preheated oven, 190C/375F/Gas mark 5, for 8-12 minutes (not more or they'll probably burn).
The smell coming from the oven is just incredible.... and believe me, all your neighbours will be queuing up outside your door :-)
Leave the pretzels to cool slightly on the baking tray, then transfer to a wire rack to cool completely.


Sprinkle them with icing sugar, instead you can mix icing sugar and lúcuma powder to sprinkle your pretzels.

To store them, simply put them in an air tight container, a tin box is ideal.


I didn't want to dip them in chocolate like the choc pretzels I did before, simply because the lúcuma flavour is woth enjoying just the way it is, although nobody says you can't use chocolate!.

ENJOY! x
Link

Thursday, September 22, 2011

Lucuma powder...yay!

*In the picture: Lucuma fruit

I was born and raised in Chile and moved to England in 2005. I never thought I would miss any fruit as we get nearly everything here. But there are two that I REALLY miss: Chirimoya and Lúcuma. This last one in particular, the flavour is difficult to put into words and the ones who have tried it will agree with me.
You don't eat the fruit as it comes from the tree, it has a dry, pastry-like texture. The fruit is mainly processed and sold as purée or mixed with other ingredients, especially for puddings (desserts). Lucuma ice cream is very popular in Chile, also Lucuma mixed with dulce de leche and added to cakes....hmmm!...Gosh I'm dribbling already!.
A Chilean friend of mine who lives in Houston, Pilar, had a gorgeous recipe in her blog that made me miss Lucuma even more....Looking online I found Lucuma powder!!! I never imagined you could find it like that and I was even more surprised when I found it in the UK....BINGO!. So I bought 500g and received it in the post today....how fabulous!!!!!


I can't wait to use it...I have so many ideas already!.

If you want to know more about Lucuma:

NAME
Lucuma

LATIN NAME
Pouteria Lucuma

Also Known As
lucmo or eggfruit

ORIGIN
A tropical plant native to lands 1000 to 2400 m above sea level in Chile, Peru and Ecuador although it can be grown in some similar climates.

PARTS USED
Fruit


TRADITIONAL HERBAL USES AND MEDICINAL PROPERTIES
Lucuma is a deliciously sweet fruit prized for it's unique taste and used as a flavour in desserts, drinks and especially ice-cream (in Peru). Lucuma is a great source of of carbs, fibre and vitamins, especially iron, niacin and beta-carotene. Sugar wise it naturally contains glucose, fructose, sucrose, and inositol.
But it's real greatness is that it is a healthy part of any diet and a totally delicious flavour. In Peru, Lucuma ice-cream is more popular than strawberry or chocolate or vanilla!
Lucuma powder is quite suitable for Raw, Vegan and Vegitarian diets and is an increasingly popular ingredient in the finest raw food recipes.

FOLKLORE AND HISTORY
Lucuma appears to have been cultivated since ancient times by the various indigenous races of the highlands of parts of Chile, Peru and Ecuador. It was an important offering to the gods and even now it is still respected by native cultures. The Ayacucho and Cajamarcan people both have powerful beliefs associated with the trees which are also still a major part of their diets.
Lucuma trees are depicted on pre-Columbian ceramics found at indigenous burial sites in coastal Peru far from where it can be successfully cultivated. This suggests it has been a popular fruit traded between cultures for a long time. It was certainly well known to the Inca (from whose language, Quechua, we get the name Lucuma) and was cultivated by them when the Europeans invaded.
Lucuma was documented by the Europeans in 1531 as growing in Ecuador. It appears in the botanical record again in 1776 when it was presumed exclusively grown in northern Chile. However in 1915 seeds were taken on behalf of the United States Government from Ollantaytambo, a mysterious pre-Incan megalithic city fotress. This suggests that either Lucuma production declined throughout the initial European invasion of the Americas or it's seemingly sporadic appearance is a result of patchy research. Either way it was not quickly adopted by the invaders and has become known as one of the “lost crops of the Inca”.
Today both Lucma production and demand is on the rise. In Peru Lucuma ice cream is believed to be more popular than vanilla, strawberry or chocolate!

DOSAGE
Eat as much of it as you like

PRECAUTIONS
None


*Info taken from: Indigo Herbs of Glastonbury where I bought the Lucuma powder from, they sell an incredible variety of herbal products and superfoods, take a look! *

Monday, September 19, 2011

Chocolate Pretzels

I like to bake, you know...but when its cold and rainy like today, I like it even more... so I grabbed one of my books, "Super Cookery, Chocolate & Baking" to look for a yummy treat... page 174 had it! "Chocolate pretzels", I saw this page many times before and thought they would be ideal for a birthday party, but not necessarily! they can also be a treat for your kids when they come back from school, or to have accompanied by a coffee with your friends.
As soon as I came back from dropping my little man at nursery, I put my apron on, rolled up my sleeves, tuned in to BBC Radio 2 and action begun.

The recipe as follows:
Ingredients:
-100g or a generous 1/3 cup of unsalted butter.
-100g or 7 tbsp caster (superfine) sugar.
-1 egg
-225g or 2 cups of plain (all-purpose) flour.
-25g or 1/4 cup of cocoa powder

To decorate:
-15g or 1tbsp of butter
-100g dark or milk chocolate to melt
-Icing sugar to dust or sugar sprinkles

1. Lightly grease a baking tray or line with baking paper.
Beat together the butter and sugar in a mixing bowl until light and fluffy. Beat in the egg.

2. Sift together the flour and cocoa powder and gradually beat in to form a soft dough.
Use your fingers to incorporate the last of the flour and bring the dough together. Make a ball, wrap with cling film and put in the fridge for 15 minutes.
3. Break pieces from the dough and roll into thin sausage shapes about 10cm/4 inches long and 6mm thick. Twist into pretzel shapes by making a circle, then twist the ends through each other to form a letter "B".


4. Place on the prepared baking tray, slightly spaced apart to allow for spreading during cooking.


5. Bake in a preheated oven, 190C/375F/Gas mark 5, for 8-12 minutes.
Leave the pretzels to cool slightly on the baking tray, then transfer to a wire rack to cool completely.


6. Melt the butter and chocolate in a bowl set over a pan of gently simmering water, stirring to combine.

7. Dip half of each pretzel into the chocolate and allow the excess of chocolate to drip back into the bowl. Place the pretzels on a sheet of grese proof paper or baking paper and leave to set. (If you want to use sprinkles, do it now before the chocolate sets).

8. When set, dust the non-chocolate coated side of each pretzel with icing (confectioners) sugar before serving.

These delicious pretzels are ideal for birthday parties, picnics... ideal with a coffee or glass of milk!. I made them for my son, when he comes back from nursery, but the friends coming over also get the benefit :-)


Wednesday, August 17, 2011

Easy evening cake

I wanted to bake today, I fancied something sweet, but simple and quick to make... and I also wanted to use some mascarpone I had in the fridge.


I made a simple sponge based on the ever versatile recipe I have used lately for the cupcakes. But instead of using paper cases, I put the mix into a 8" tin and baked for 25 minutes instead of 15 and I added a teaspoon of pure vanilla extract instead of orange zest. Great result!!!


For the frosting was mascarpone cheese mixed with cocoa powder, sugar and a drop or two of pure vanilla extract... mix mix mix and then spread over the cake with a spatula. Then I sprinkled some chocolate spaghetti (from Morrisons)....and that's IT!

So, the recipe:
Ingredients:
-350g plain flour
-1 1/2 tbsp baking powder
-140g caster sugar
-1/2 tsp salt
-2 eggs
-250ml milk (I used semi-skimmed and it worked well)
-1 teaspoon of pure vanilla extract
-85g butter, melted

Method:
1. Preheat the oven to 200°C/Gas 6/Fan oven 180°C
2. Line a round 8" deep tin .
3. Sift the flour and baking powder into a large bowl, then stir in the sugar and salt.
4. Beat the eggs and milk together in a jug or bowl, add the pure vanilla extract, then stir in the butter and gently mix into the dry ingredients to make a loose, slightly lumpy mixture. Do not overmix or the cake will be tough.
5. Fill in the tin
6. Bake for 25 minutes until well risen and golden on top.
Allow the cake to cool for 15 minutes in the tin, then carefully remove and place on a plate.
7.Put the mascarpone cheese in a small bowl, add a tablespoon of sugar (You can use less or more, up to you), a teaspoon and a half of cocoa powder, a couple of drops of vanilla extract (optional), then mix well, you can use the electric mixer if you want. Spread over the cake with a spatula and sprinkle chocolate spaghetti or any other on top.

Enjoy!!

Thursday, August 11, 2011

Birthday cupcakes

I had another perfect excuse to bake, but not just to bake, also decorating, which is always fun. Jasmine turned 19 on the 1st of August, I told her I would do her cake....or cupcakes, she preferred the second option. I used the same versatile recipe I shared with you all in the 2 previous posts, I changed it again and it was fabulous. I made two types of cupcakes:
-Chocolate with pieces of caramel biscuits inside
-Orange-Vanilla

For the toppings I knew exactly what I wanted to do. But first I have to confess something.... I totally dislike buttercream....the name sounds rather yummy but the first time I made it as frosting, my face nearly got green. I love butter, don't get me wrong... but I don't fancy biting a block of butter...yuk! and buttercream is basically that, butter and sugar.
Anyway....lets leave my buttercream issues behind and let me tell you about the great frosting recipe I found.
In one of Sainsbury's magazines (to be exact, October 2009), there was an article that caught my attention: "Cupcake masterclass, 5 easy steps to sweet perfection", I was surprised when I saw that the recipe only needed very little butter, so I gave it a go and it turned out delicious, although I have to say, between you and I....that I can improve this recipe...and I will!.

I made 24 cupcakes, 12 chocolate and 12 orange-vanilla, so I decided to make 2 frosting flavours; strawberry and vanilla and!... marzipan toppers, which I personally love.
I also got myself a cupcake stand that helped to arrange them nicely.

For the chocolate cupcake recipe, please click HERE, omit the caramel and instead of using 50g of cocoa, only use 25g (that's enough) and 325g of flour. I filled the cases half way and then pushed in pieces of caramel biscuits, then filled all the cases with the remaining mix.

For the orange-vanilla cupcake recipe please click HERE, omit the cream cheese and strawberries and add a teaspoon of vanilla extract.

*For the strawberry and vanilla frosting*
Enough to cover 24 cupcakes.
Note: frosting and frosted cupcakes will keep in a sealed container in the fridge for a few days. Bring frosting back to room temperature before using.

Ingredients:
-200g full-fat cream cheese, at room temperature.
-100g soft unsalted butter.
-600g icing sugar, sieved.

1.Put the cream cheese, butter and icing sugar in a mixing bowl.
2. With a big wooden spoon, slowly mix together, until you have blended all in, then use an electric mixer until you have a nice and creamy consistency.
3.Divide the mix in two smaller bowls.
Note: if the mix seems too runny, add a little bit of icing sugar.

For the strawberry flavour one, add 1 tablespoon of strawberry jam, sieved, and a drop of pink food colour. Mix well. You can then use a decorating bag with a big star tip to decorate your cupcakes.

For the vanilla flavour frosting, add the seeds of 1 vanilla pod or 1 teaspoon of vanilla extract. Mix well. And as above, you can use a decorating bag.

If you're interested to do the marzipan toppers, let me know and I'll try to put a tutorial, its a lot of fun making them...and eating them as well!.

Don't they look great?...

I didn't have any, they all went to Jasmine's birthday party and I heard later that everybody loved them.... job done! :-)


Monday, July 25, 2011

Chocolate and Dulce de Leche Cupcakes

I felt a bit baking-adventurous today and made a variation of the strawberry cheesecake cupcakes from the last post. I usually follow recipes and never try my own thing, but this time I wanted to do something different...chocolate and dulce de leche, two flavours that were made for each other, such a treat!.
So, when mixing the ingredients, I replaced 80g of flour for cocoa powder....and I have to say, I would probably use less cocoa next time, 50g would be just fine.

Filled the cases halfway, then I added a teaspoon of dulce de leche...


Topped them with the rest of the mix:


Ready to go to the oven...


And...voilá!


They exploded a little bit, but it worked...yay!.
These cupcakes taste fenomenal, really chocolatey....I will definitely bake them again!.

Recipe:

It makes 12 muffins.
Ingredients:
-300g plain flour
-50g cocoa powder
-1 1/2 tbsp baking powder
-140g caster sugar
-Finely grated rind of 2 medium oranges
-1/2 tsp salt
-2 eggs
-250ml milk (I used semi-skimmed and it worked well)
-85g butter, melted

For the filling:
-180g dulce de leche (Carnation sells a tin of Caramel = Dulce de Leche)

Method:
1. Preheat the oven to 200°C/Gas 6/Fan oven 180°C
2. Line a muffin tin with 12 paper cases.
3. Sift the flour, cocoa powder and baking powder into a large bowl, then stir in the sugar and salt.
4. Beat the eggs and milk together in a jug or bowl, then stir in the butter and gently mix into the dry ingredients to make a loose, slightly lumpy mixture. Do not overmix or the muffins will be tough.
5. Half'-fill the paper cases with the muffin mixture, then push a teaspoon of dulce de leche into each, then spoon over the remaining muffin mixture to cover and fill the muffin cases.
7. Bake for 15 minutes until well risen and golden on top. Remove from the tin and allow to cool completely on a wire rack. (I let them cool in the tin).

ENJOY!

Friday, July 22, 2011

Strawberry Cheesecake Muffins/Cupcakes


A good friend of mine and her little daughter came to visit us today, the perfect reason to bake something nice!, I didn't want to make anything I have done before so I went to my books and found what seemed like a delicious treat for kids and adults...Strawberry Cheesecake Muffins....what about THAT!...yup...cupcakes with a very yummy filling...

Want to give it a go?....take note then:

It makes 12 muffins.
Ingredients:
-350g plain flour
-1 1/2 tbsp baking powder
-140g caster sugar
-Finely grated rind of 2 medium oranges
-1/2 tsp salt
-2 eggs
-250ml milk (I used semi-skimmed and it worked well)
-85g butter, melted

For the filling:
-175g half-fat soft cheese
-3tbsp caster sugar
-6 small strawberries, halved...and maybe some more to put on top to serve when they're ready.

Method:
1. Preheat the oven to 200°C/Gas 6/Fan oven 180°C
2. Line a muffin tin with 12 paper cases.
3. Sift the flour and baking powder into a large bowl, then stir in the sugar, orange rind and salt.
4. Beat the eggs and milk together in a jug or bowl, then stir in the butter and gently mix into the dry ingredients to make a loose, slightly lumpy mixture. Do not overmix or the muffins will be tough.
5. Mix together the soft cheese and sugar for the filling.
6. Half'-fill the paper cases with the muffin mixture, then push half a strawberry into each. Top with a teaspoon of sweet cheese, then spoon over the remaining muffin mixture to cover and fill the muffin cases.
7. Bake for 15 minutes until well risen and golden on top. Remove from the tin and allow to cool completely on a wire rack. (I let them cool in the tin).

*Recipe taken from the book "GoodFood 101 cakes & bakes"*


Saturday, May 7, 2011

Chocolate and mango layer cake

When I started trying new recipes and after a few disasters, my lovely neighbour and friend came to see me, she said "I have something for you" with a big grin on her face that made me smile... she gave me a small but very consistent book called "Chocolate & Baking"...hmmm! it sounded fabulous....just what I needed!, 508 pages of great recipes, couldn't be a better present!. I have tried a few and they're really good....almost as good as "BBC Good Food".
I mrked all the recipes I wanted to try, all too many I suppose, but someday I' will try them all, yay!.
One of those recipes I marked with a bit of paper, was this one....and OMG is good!. This is probably the fifth time I make it, but the first time I take a picture of it.

The sponge is very firm, so after trying it so many times, I decided to pour a bit of the mango juice mixed with sugar, on the sponge layers before I put the filling.
The original recipe doesn't add any sugar to the cream and mango mixture, but I have done (1/2 cup of sugar) otherwise is not sweet at all.

Ingredients:
-50g cocoa powder
-150ml cup boiling water
-6 large eggs
-350g cup caster (superfine) sugar
-300g self-raising flour
-2 x 400g cans of mango
-1 tsp cornflour (cornstarch)
-425ml cups double (heavy) cream
-75g dark flock chocolate or grated chocolate

1. Grease a deep 23cm/9 inch round cake tin (pan) and line the base with baking parchment.

2. Place the cocoa powder in a small bowl and gradually add the boiling water; blend to form a smooth paste.

3. Place the eggs and caster sugar in a mixing bowl and whisk until the mixture is very light and foamy and the whisk leaves a trail that lasts a few seconds when lifted.
Fold in cocoa mixture.
Sieve (strain) the flour and fold into the mixture.

4. Pour the mixture into the tin (pan) and level the top.
Bake in a preheated oven, 170C/ 325F/ Gas Mark 3, for about 1 hour or until springy to the touch.

5. Leave to cool in the tin (pan) for a few minutes then turn out and cool completely on a wire rack.
Peel off the lining paper and cut the cake into 3 layers.

6. Drain the mangoes and place a quarter of them in a food processor and puree until smooth.
Mix the cornflour with about 3 tbsp of the mango juice to form a smooth paste. Add to the mango puree. Transfer to a small pan and heat gently, stirring until the puree thickens. Leave to cool.

7. Chop the remaining mango.
Whip the cream and reserve about one quarter. Fold the mango into the remaining cream and use to sandwich the layers of cake together.
Place on a serving plate.
Spread some of the remaining cream around the side of the cake. Press the flock or grated chocolate lightly into the cream. Pipe cream rosettes around the top. Spread the mango puree over the centre.

Saturday, April 30, 2011

The best Lemon Meringue Pie


I've lost count of how many times I have made this lovely pie, is simply one of my favourites!!. The ones you buy at the grocery store can't compare to the home made ones, don't you think? especially when you've tried this one in particular! HA!....after you've tried this recipe, your life won't be the same.

Seriously, please take note, the recipe is HERE. This is my second post about the lemon meringue pie and I promise it will be the last one hehehehe. I have to say, the more you make this recipe, the better the results!.

Thursday, April 28, 2011

Salmon and Broccoli Lattice Tart....yum!

I love to try new recipes and I'm always looking for them, I have copied recipes from many sites and they're never as good as the ones I get from "BBC Good Food" magazine (or their website!). ALL the recipes in the magazine are fantastic (trust me), the ones you find on the website have very useful reviews that help you to select.
Today I went to the local store with my son to get some chocolate, I got a little net bag full of chocolate bunnies, I was ready to go, but when I turned around I saw the magazine section and my eyes got stuck on my favourite magazine....have you guessed which one? .... the cake on the cover looks sooooooooo delicious I couldn't leave the shop without it!


I took a good look and OMG....this magazine is full of mouth-watering recipes!. I always go for the sweet things but I found the following recipe a "must" for dinner tonight....

What do you think???.....and this was the result!:

Not as perfect as the one on the mag, but soooooooooooo incredibly tasty....


The watercress mixed with the creme fraiche makes a difference....YUMMY!
I'll have to post the recipe, I can't just show the pictures, especially if you don't live in the UK and can't get the magazine....so here we go:

Ingredients:

-100g (4oz) broccoli, cut into florets
-85g (3oz) watercress, chopped
-4 tbsp half-fat creme fraiche
-435 g pack ready-rolled puff pastry sheets
-1 egg, beaten
-170g pack poached salmon fillets, flaked
-steamed green beens, to serve

1. Cook the broccoli in lots ofboiling water until tender. Drain and rinse in cold water until cool. Drain well and set aside. In a mini chopper or food processor, blitz the watercress and creme fraiche with some seasoning.

2. Heat the oven to 200C/180C fan/gas6.
Unroll the pastry sheets. Place one on a baking sheet, cut out a 2cm-wide border from the second sheet, like a picture frame, and stick this onto the first sheet with some of the beaten egg. Prick the base all over with a fork. Bake for 10 minutes until golden.

3. Cut the remaining pastry into 2cm wide strips. Spread on the creme fraiche, scatter with the flaked salmon, broccoli and seasoning, and top with the strips of pastry to make a lattice.

4. Brush with beaten egg and cook for 20-25 minutes until pastry is golden and cooked through and the filling is hot.
Serve with green beans (we had it with green salad).

Enjoy!!!!!!!!!
Related Posts Plugin for WordPress, Blogger...